Would you like to make this site your homepage? It's fast and easy...
Yes, Please make this my home page!
Sittingbourne Angling Club
Articles - Feature
Finding
The basic equipment:
1.
Rod: What distance do you fish to mainly, do you often fish at long
distance (80yards+) then you'll need to use a rod with a bit of oomph
(technical term) for the marking up, however you don't need to buy purpose
made marker rods for marking, I use the same rod for marking that I use
for fishing, namely a 2 3/4 test curve Long Distance model (Daiwa Power
mesh X).
2.
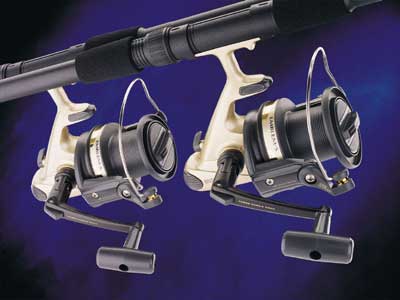
Reel: as for number 1 if you are marking up at distance you will need a
larger spool reel to help with the cast, so once you've decided you need
perhaps a large spool reel, you again don't need to buy an emblem 5000s
just for marking, I bought myself a Shakespeare sea reel, lots of line and
winds in quite quickly, only cost me £30! ( I also use one for me spodding
but that's another article). NOTE, you will need one with a line clip,
very important!
3.
Line: For line I use cheap 15lb mono, you can use purpose made
braids, Fox and ESP among others market braid designed for this, if you
decide to use braid then are both good and bad points to remember (pros:
very good feature detection, cons: need to wear a glove or finger
protector, also expensive) also you may need to buy some sort of
protection for your finger. again its a personal preference thing, I have
used braid and didn't get along with it, but I know people who do use it,
and love it!
4.
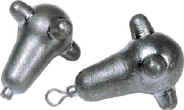
Leads: O.K. leads you can use 2.5 (minimum weight) up to 4oz leads, dumpy
pears are better than most, the best ones are the Fox feature finding
leads, they have no coating (increased feel) and four knobs at the
"corners" again increased feel, they come in a pack of two, one normal
lead with a swivel directly attached and one with a 2 inch wire extension
to the swivel to help in weedy situations, again its up to you but I do
love these leads for feature finding.
5.
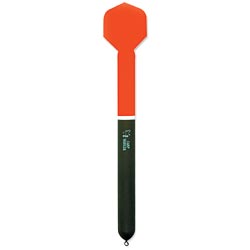
Floats: Entirely up to you this section I prefer the fox one again (I
don't work for Fox!!!) but there are loads out there, all the big names
are making them, however I will mention the ESP sonar one with the three
interchangeable vanes, the thread that these vanes screw on to snapped off
on the cast, this has also happened to a much more experienced angler that
me, that doesn't mean that everyone will do the same just something to
bear in mind
6.
Rigby bits: Ok you will need 2 small rubber beads(4mm) and 1
larger one (6mm) between the sliding lead and the float, if you are using
a normal lead with a boom section you'll need the boom section to be
longer than the float and 15lb break or more, you will also need a large
run ring for the boom section.
Setting up the rig:
If
this sounds like being taught to suck eggs, forgive me, right thread line
through rod rings!! now thread on the lead, passing the line through the
run ring, now thread on two small beads and then the large one, now tie on
the marker float using a secure knot of course ( I recommend the 5 turn
grinner )
Using the Marker setup:
1.
Now you are ready to mark it up baby! ok well never mind that, cast out to
the edge of the area you can sensibly fish, once the lead has hit the
floor, tighten the line to the lead with the rod pointing at the lead, now
standing sideways on slowly pull the rod from pointing to the lead to
pointing away from your body (I.e. a 90o Turn) watch the tip and feel the
twitches/bumps.
2.
From pulling the rod you will get one of 3 types of indications, type 1
bumps, this is gravel! result! gravel is good type 2 smooth pull back,
this is silt/clay and means the bottoms clean Type 3 sharp pulls and maybe
even locked up, the dreaded weed! ok you now know what's on the lake
floor, but where abouts is it exactly!!!
3.
tighten to the lead again, now mark off a foot on the rod itself from the
reel bale arm to a foot long on the rod, either using backwind or loose
clutch ( a baitrunner reel makes this job so easy!) peel off the line in 1
ft lengths counting as you go, remember one the float has surfaced, you
now have a rough guide to depth and a visual indicator as to where the
feature is, try and line up this feature with a permanent horizon marker,
and also remember to mark where you are standing and make that permanent
too, I.e. I line up with the end of my pod/bank sticks.
4.
Continue steps 1-3 to mark out the make up of the lake bed in front of
you, for a short session I would recommend only casting to one feature if
at all with the marker float, for longer sessions (24hrs+) take your time
you could find something real good to fish to!
5.
If you are only fishing to this feature then clip up the line, pass the
line under the spool clip but only when the line is tight to
the lead. now whilst the marker is out there in the swim, cast your rigs
to the marker float, this is where the depth is important, depending on
how deep it is you will need to cast beyond the marker float to make the
lead fall to the bottom near the lead marker.
I.e.
if its 6 foot deep you will need to cast approx 6ft beyond the marker,
hold the line tight on the cast so that the weight swings back to the
marker. therefore making a very accurate cast to that
feature.
6.
remember the horizon marker you used, you can now with a tight line to the
lead clip up your mainline and then mark the line with a small piece of
white tape doubled over, or line marker braid (courtesy again of fox,
sorry I don't love em!) so that you can cast and recast at night time
accurately and confidently
Summary:
Ok i
dont profess to having the best system to use but i find it easy and
simple to use, to help with the marking up of a feature and casting
accurately to it, remember marking up isnt needed if you know the lake
intimately but ultimately it can be a great weapon in the
battle.
All rights
reserved. Copyright 2002 © Sittingbourne Angling Club


